How, what and when? Hardy annual flowers. A guide for cut flower growers.

For those just embarking on the rock and roll, rollercoaster ride that is the glitzy and heady world of cut flower gardening, it is important to choose the right flowers at the outset.
Hardy annuals are perhaps the easiest of all the flowers you can grow for your cutting patch. This does not mean that they are any less beautiful than anything more challenging to grow. Hardies are often ‘cut and come again’, in that you can keep harvesting the flowers over a long period and more will grow until the plant is finally exhausted.
I would say about two-thirds of my flower patch is made up of Hardy annuals…I love the little beasties.
“What Is A Hardy Annual?” Well first off let’s start with a definition:
“The definition of a hardy annual is simple enough. It’s a plant that goes through its entire life cycle in one season and which can be sown outside in the open garden in spring where it is to flower. In many areas this carries with it the implication that it can happily survive the spring frosts as a seedling. ” Graham Rice.
Hardy annuals are flowers which are sown, flower and die within one year and can withstand frost as opposed to half hardy annuals. Some of them are super robust and can be sown straight into the ground in Autumn and will soldier through the winter without protection. Others may need some horticultural fleece to get them through the coldest and frostiest (real word?) of the short winter days.
By far and away the most common time to sow these as a cut flower grower is in the spring. They can successfully be sown in the autumn (Well early summer is better.) but we will deal with autumn sowing in another post…being as the autumn is over and this might leave you upset and tearful that you missed a window of opportunity…let us quickly move on…
*SOWING HARDY ANNUAL FLOWERS DIRECTLY INTO THE SOIL.

(NB ‘No dig’ methods are becoming increasingly popular…I have had mixed results. My thought are the eco-benefits are negligible with a modest cut flower garden, especially if you are lorrying in compost…..BUT some people swear by this method….search ‘Charles Dowding No Dig’ for more info.)
This is the simplest way if you have a weed-free flower patch.
It is futile to sow your seeds too early in the season. Seeds sown too early will sit there sulking in the cold soil and will be glorious food for the hungry mice. I don’t sow outside until at least mid-April and even then only if the weather looks mild for the next week or so.
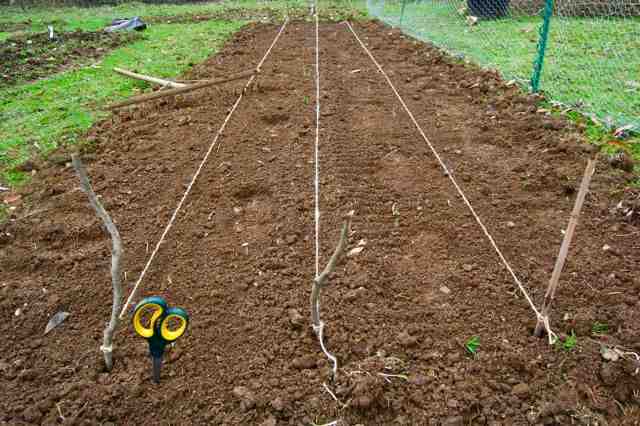
I usually ike my flower beds to have three rows of flowers in them each a foot apart. Three feet wide is a good width. If you haven’t got much room then make the paths between the beds narrow but if you have the space it is better to have enough room for a wheelbarrow. Often I totally ignore this method and have very narrow, bare earth paths and really wide beds….this give s a meadow vibe.

Before you sow, dig your soil over until it’s a fine tilth and is totally weed free. Add a good deal of compost if you can as it will keep the soil free draining and help to stop it from becoming compacted.
When in your wisdom you have decreed that it is warm enough to sow your seeds, sow them thinly in straight shallow drills. Three lines right down the length of the entire bed. Your seeds only need a light covering of soil. Three or four millimetres is usually fine. Remember, they are seeds and not moles.
Water them gently. The chances are that in April the soil already has plenty of moisture in it to get the seeds germinating. Too much water will just make them cold and grumpy.
Outdoor sown seeds will take a couple or three weeks to show themselves depending on the soil temperatures.
When the seedlings are about as big as your thumb you can thin them to about a foot apart.
Keep on top of the weeding. Native weeds will grow quickly and can swamp your flower seeds if left to roam about being bullish.
Your plants should start flowering in June, dependent on the weather.
*Sowing Hardy Annual Flowers undercover.

Sowing into pots before planting out sounds super faffy but it has one huge advantage in that your weeding is all but eliminated. I sow into three-inch square pots from early April. Sow the seeds into good quality compost. I use Melcourt Peat Free and it works for me. Don’t use cheap compost as it seems to get green gunky stuff developing which slows down the growth of the seedling.
Thin your seedlings to just one per pot…yes I really do mean that…I know it feels wrong but just get on it. Too many in a pot will make them all weak and leggy. Thin them early…don’t let them get even a centimetre tall. If you sow your seeds thinly this won’t be much of a problem.
The seedlings can then happily hang about in these pots until late May when all of the frosts have packed off up north. Naturally, you need to keep them watered.
Using this method allows you to quickly clear your beds before you plant up your seedlings. Then mulch around the seedlings…I use a layer of compost. It helps keeps the weeds down and the moisture content up.

After planting you can pretty much let your plants get on with it. Just make sure the patch doesn’t dry out.
It is a really good idea to measure the area of your cutting patch to work out how many plants you can sensibly get in there. Very roughly you can get about ten per square meter. You may find that you need fewer plants than you imagined. I would sow up twice as many pots as you need plants. This will allow for any failures and also leave you with enough so you can give them to friends and neighbours, thereby demonstrating your silky skills.
I could give you a list of my favourite hardy annuals to grow but the easiest way is to visit the hardy annual section of the Higgledy seed emporium here you will see them in their glory. :)
If you have any questions you can find me on Facebook, Twitter and you will see heaps of photos of flowers, the boat garden and Flash on Instagram.
You can, of course, find all my seedy goodies in the Higgledy Shop.
Kind regards
Benjamin Higgledy
